
This Blog is a continuation of my last Blog “Part One – Creating a Quick Report using Quick Viewer (SQVI)”. That Blog outlined the steps required to create a quick and simple query/report using transaction SQVI.
This Blog will cover:
- Using SQVI Layout Mode
There are two “modes” that can be used when creating a Quick Viewer Query, Basic & Layout. As mentioned in Part One Blog I like to use Basic Mode to create the query and then switch to layout mode to get a clear picture of the report’s / query’s layout. The first part of this blog covers the Layout Mode.
- Copying existing Quick Viewer (SQVI) Query.
I highly recommend copying an existing Query when adding new tables (joins) to an existing SQVI Query. Joins are not forgiving. If you join a new table that negatively impacts your query, which can happen, you may not be able to un-join or delete the new table. This means you have to re-build the entire Query from scratch. Never fun.
- Adding new tables to existing Quick Viewer (SQVI) Query.
In the “Part One” Quick Viewer Blog we created a simple purchase order query joining tables EKKO (Header) and EKPO (Line Item). In this Blog we will add table T024 (Purchase Group text) and EKET (Scheduling Agreement Schedule Lines).
- Adding a Transaction Code to Quick Viewer (SQVI) Query.
This is quick, simple and cool. But depending on security and environment setting may not be possible in some systems especially Production Environment. And this is not transportable because the SQVI program name is uniquely generated in each system.
Other SQVI related Blogs to check out:
- How to Convert Quick Viewer (SQVI) to SAP Query
- How to execute other User’s Quick Viewer Queries (SQVI)
- Creating a Quick Report using Quick Viewer
As always my goal is that any knowledgeable SAP person can successfully use the following information, however this is not an SAP training manual and does require a good understanding of SAP and specifically a strong understanding of how the data you are wanting to report on fits together.
Recommended Saving your query every once in a while. I usually hit save after every step in process. Nothing worse than spending quite a bit of time on a query to have a “glitch” kick you out and nothing is saved.
Quick Viewer – Tips and Tricks – (Transaction SQVI)
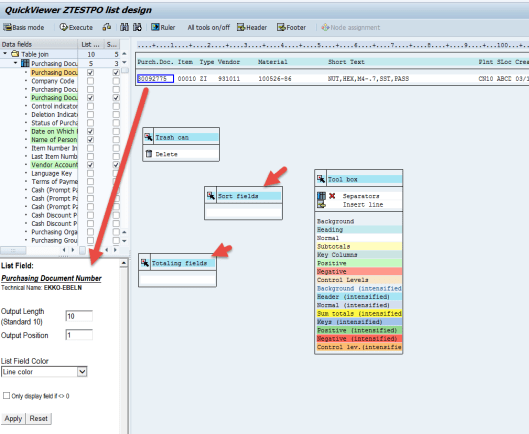
- Quick Viewer – Layout mode In layout mode you can:
While in create or change mode click on the “Layout mode” icon.

Layout mode shows you how the report will look once the Query is executed. I usually build the Query in Basic mode then switch to Layout to put finishing touches on report and review the reports layout.
In layout mode you can:
- Drag and drop fields.
- Add new field to Query or new field to selection screen.
- Change field lengths.
- Easily select fields to sort or total by dragging to Sort or Totaling boxes.
- Select option to only display a field if the field is not equal to zero.
- Along with several other things.
Quick Viewer, like most SAP Reports, only allows you to have so many characters in a row. After that a new row will be started. Layout view is a great way to see what fields are in which road.
2. Copy Existing Quick Viewer (SQVI) Query
There are a few reasons to copy a SQVI Query but the main reason I do it is so I do not screw up a good query when adding new tables. A lot of SAP tables will work without any issues. But on occasion a table will not work as you are expecting and the Query results will not be correct. This would be OK but once you have joined a table and selected fields SAP will not let you delete / remove the join from the query.
Transaction SQVI
Select Query and hit “Copy” Icon. A Pop Up box will appear.

In Pop Up box enter new name in “To” field. The hit enter.

The new Query, ZTESTPO_II, will now appear in the SQVI query list.
3. Add / Join New Tables to Existing Quick Viewer (SQVI) Query
In this step we will add two new tables to the SQVI Query we created in previous step.
Adding Tables: T024 (Purchase Group text) / EKET (Scheduling Agreement Schedule Lines).
We will use table T024 to add the purchase group description to our query. And table EKET will be used to add the delivery data and good receipts quantity.
We will also need to add the purchase group from table EKKO to our Query before joining T024. I will not show this step but wanted to mention it.
In Basic mode you access the tables via the Data Source tab. Note we added the Purchase Group from table EKKO (header) table. T024 join will not work without this field.

Once in the “Change join” screen select the “Insert table” icon (1). A Pop Up box will appear enter table T024. SAP will not generate a join you will have to manually join T024 with EKKO. To join right clicking on the Purchase Group field in T024. Without releasing the right click drag your curser to the Purchase Group field in EKKO (2).

Select the “Insert table” icon (1) and we will now add table EKET. In Pop Up box enter table EKET and hit enter. You will have to manually join EKET to EKPO. Join both the Purchase Document Number and Line item number fields.

Use green arrow to back out of screen or F7.
Save Query. When you save the query it “regenerates” and you will get a big Pop Up box. Just enter past it.
Don’t forget you will need to add the fields you want from table T024 and EKET.

4. Add Transaction Code to Quick Viewer (SQVI) Query SE93
As stated earlier adding a transaction code to a SQVI Query is quick, simple and cool. But depending on security and environment setting may not be possible in some systems especially Production Environment. And this is not transportable because the SQVI Query / program name is uniquely generated in each system.
Before creating the transaction code for the SQVI Query we will need to get the Query program name. These next steps will show where the program name can be easily found.
Get Program name of the SQVI Query. To do this select the query from SQVI list and Execute. This will bring you to the Query’s initial selection screen.
On initial selection screen follow menu: System > Status. A Pop Up box will appear
Screen Shot: Initial Selection Screen
.
Pop Up Box: Select and Copy the program name. The program name will be needed in next step, transaction SE93.

Adding Transaction Code to Quick View Query
Adding a transaction obviously makes it easy to share the SQVI Query. But as mentioned you may not have access to this transaction in Production environment.
Transaction SE93 – Maintain Transaction
- Hit “Create” Icon (F7).
- In Pop Up box enter:
- Enter Transaction Code – Recommend starting with a “Z”.
- Enter Short Text
- Select “Program and selection screen (report transaction)
- Hit enter

On the next screen enter the Program name and Save.

After hitting Save you will get a Pop Up box. Hit the “Local Object” icon. This is related to transports and as previously stated you can’t transport this transaction because the SQVI Query name is system specific.
You may have to “Green Arrow” (F3) out of transaction.

I have found adding a transaction useful on Implementation, Upgrade and Roll Out project. The type of projects when you spend a lot of time in DEV and QAS environments. Very seldom, especially now days, do I add a transaction in the Production environment.
There are other ways to share an SQVI Query, converting to SAP Query or Following the steps to execute another users SQVI Query. See related blogs below. But adding a transaction helps insulate the SQVI from unwanted changes by other users.
Other Blogs:
- How to Convert Quick Viewer (SQVI) to SAP Query
- How to execute other User’s Quick Viewer Queries (SQVI)
Converting to an SAP Query or adding a transaction code really depended more on the SAP security of the company you are working with and how their opinion of SQVI / SAP Query’s. Some company’s love SQVI / SAP Query other don’t. A lot of the dislike for SQVI / SAP Query’s is hold over from the 3.1 / 4.6 days when a badly written query could eat up a lot of processing time / resources on the server. This will not happen in an ECC 6.0 environment.
End of Blog – www.portsap.com
If you have question on this or any other PortSAP Consulting blog please feel free to contact us at Blog@PortSAP.com. Or if you are looking for Top Quality SAP Consultants please feel free to contact us.
The author, Ray Hornbrook, has over 18 years of SAP functional and technical experience. Ray started his career in SAP as a MM/PP Subject Matter Expert (SME) for a SAP implementation in 1998 and is now a Senior Level SAP Consultant. Since Ray has worked both sides of SAP, business end user and IT professional, he is able to communicate effectively with both IT and Business team members. Having a background as an SAP business end user has helped Ray greatly in his consulting career. The business background helps him better communicate with the business members of the team. As well as helping bridge gaps in communication between the IT and Business team members.
To find out more about the Ray Hornbrook please check out his LinkedIn profile by clicking HERE.
Neither PortSAP Consulting nor the author of this Blog is associated with SAP AG or with any of its subsidiary or alliance company. Trademarks used in our website are registered trademarks of respective companies and neither PortSAP Consulting nor the author of this Blog is associated affiliated with these companies.

Pingback: SAP SQVI – Part 1 – Creating a Quick Report using Quick Viewer | PortSAP Blogging