
In a couple earlier Blogs I’ve talked about “tips” for SQVI (Quick Viewer) but have not gone into any detail on how to use SAP Quick Viewer. So now is the time. This Blog will cover the steps required to setup a simple Quick Viewer Query.
Created a SQVI – Part Two to this blog. It covers the Layout Mode and shows how to add a couple useful tables to the Purchase Order Query we will create in this Blog. Click here for Part Two.
Quick View (SQVI) is a great tool that allows an end user to create a simple report/query for their personal use. I’ve found that people who are good with Excel pickup on Quick Viewer pretty easily. Don’t worry if you are not familiar with Excel that doesn’t mean you won’t be able to use Quick Viewer. It is a pretty straight forward tool that with a little practice you should have no problems using.
Quick Viewer allows you to create a query based on a single table, joined tables, existing SAP Query InfoSet or a Logistical Database. For the purpose of this document we will join a couple purchase order tables together.
Quick Viewer (SQVI) Notes
- Quick Viewer creates basic lists, which is great for simple reporting needs.
- With Quick Viewer you should keep the number of tables being joined to just a few. Two or three works well but when you start getting above 4 or 5 reports don’t always work like you expect.
- One advantage of Quick Viewer over a Standard SAP report is that you can select / report on fields that may not be in a Standard SAP report. One example of this from a purchase order standpoint is the “Your reference” field on the purchase order header.
- You will need authorization to transaction SQVI.
- Quick Viewer will not allow you to look at data you do not already have authorization to view. Granting of course that your security team has done their job from SAP authorization standpoint.
- Always double check join conditions that are automatically proposed by SQVI. You will find that some of the SAP suggested fields to join are not really identical fields. If these joins are not removed they query will not work.
- Quick Viewer by designed is user dependent so only the person that created the query can see / use the query. With that said there is a way around this please see earlier Blog, click here.
- Another good Blog to check out is “How to Convert Quick Viewer (SQVI) to SAP Query”.
There are two “modes” to be used when creating a Quick Viewer Query, Basic & Layout. We will be using the Basic mode. Layout mode has more of a graphic interface, which makes it a little simpler to see report layout but it is lacking in other arears. Again in this blog we will be using Basic but I suggest once you have created a query to switch to layout mode to check it out. Layout Mode gives a better picture of the report / query’s layout.
Important to keep in mind that Quick Viewer is designed to be a quick / simple tool if you need several tables joined or complex selection strategies you should probably look at SAP Query or an ABAP Program.
As always my goal is that any knowledgeable SAP person can successfully use the information in this Blog, however this is not an SAP training manual and does require a good understanding of SAP and specifically a strong understanding of how the data you are wanting to report on fits together.
Recommended Saving your query every once in a while. I usually hit save after every step in process. Nothing worse than spending 30 or 40 minutes on a query to have a “glitch” kick you out and nothing is saved. When you save the query it “regenerates” and you will get a big Pop Up box. Just enter past it.
Steps for Creating Quick Query (SQVI)
1. Enter Transaction SQVI
- Enter a name in Quick Viewer field, see below.
- Hit Create icon. A pop up box will appear.
Once you create a Quick Viewer query you will see it displayed in bottom half of this screen. From this screen you can change, display or execute your queries.

2. Pop Up Box – Choose Data Source
- Enter Title for you Query.
- Enter comments / notes about the Query, i.e. table names or reason for query.
- Select Data source – In this example Table Join.
- Basic mode will default – In this example do not change.
- Hit enter.

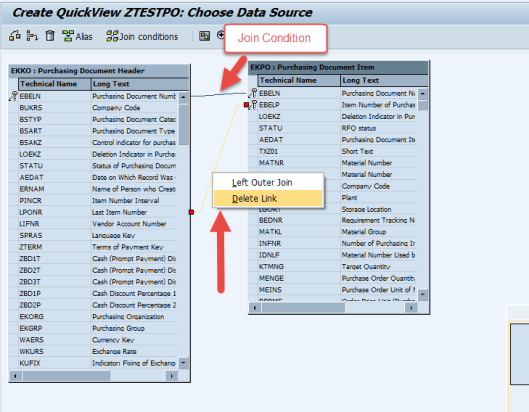
3. Screen – Choose Data Source
In this example we will join purchase order tables EKKO (PO Header) and EKPO (PO Item).
-
- Hit Insert Table icon – Pop Up box will appear.
- In Pop UP enter first table name – EKKO.
- Hit Enter.
Repeat these steps for table EKPO.

4. Screen – Choose Data Source (Continued)
SAP automatically proposes join conditions based on the fields in each table. Seems like a good idea but unfortunately many times the join conditions are wrong and if not corrected your Query will not work correctly.
In our example the top join between the EBELN fields is correct while the lower join between “item number” fields is incorrect and will result in the Query not working correctly. This is something you have to watch for when joining tables in Quick Viewer.
- Left click on the incorrect join condition and select “Delete Link”.
- Use green arrow to back out of screen or F7.
- Save Query. When you save the query it “regenerates” and you will get a big Pop Up box. Just enter past it.
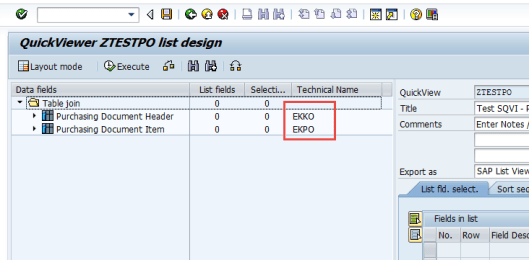
5. Screen – Quick Viewer: ZTESTPO list design – Choosing “List fields” and “Selection fields”
There is actually two different ways you can continue from here. Either by using “Basic Mode” or “Layout Mode”. Basic Mode uses the GUI type screens for which SAP is known. While Layout Mode has a little more of a graphical interface. I like to start in Basic Mode get things setup to how I think I want them and then switch to Layout Mode for final touches if needed.
In this step we will select the fields we want to see in the query and the fields we want to use on the initial selection screen. In the top left portion of screen you should see the tables you just finished joining. Select / open the top table.
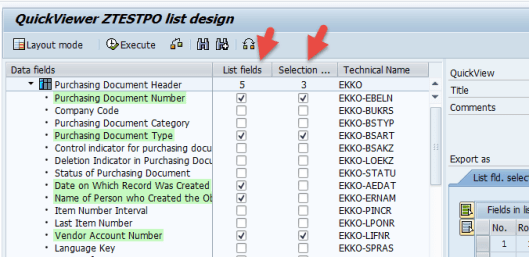
Then select the fields you want to be listed in the report and the fields you will use on initial selection screen. Once done with first table repeat on second table.
Note: In the case of fields like purchase document number you only need to select the number once even though it is on both table. Recommend always selecting the field on the parent / higher level table. In this case PO Number is on both EKKO and EKPO. Since EKKO is the PO header table I have selected the PO Number from this table.
Screen Shot: EKKO Field Selections
Screen Shot: EKPO Field Selections

Save Query. When you save the query it “regenerates” and you will get a big Pop Up box. Just enter past it.
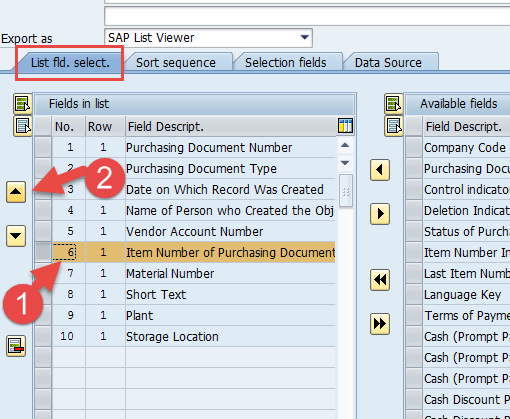
6. Screen – Quick Viewer: ZTESTPO list design – List Fields / Selection Fields
On the “List fld. select.” tab we can change the order the fields appear in the query. You can move the lines up and down by selecting it and using either the up or down arrows. You can also select fields from the “Available fields” section on right side of this tab. (Select field hit left or right arrow).
In this example we will select the “Item Number” field (6) and move it up to line 2 just below the “Purchasing Document Number” field.
Note: The fields will default to the order you select them in previous step.
Don’t forget to save your query periodically after making changes.
“Selection Fields” tab – Follow same steps for changing order of fields on selection screen.
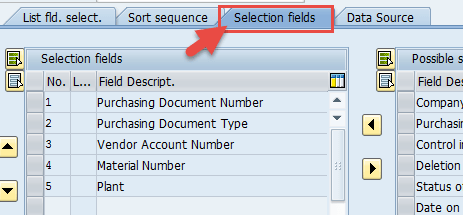
Again, don’t forget to Save Changes. It’s now time to Execute the Query.
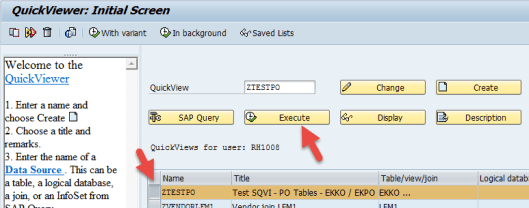
7. QuickView: Initial Screen
Now it is time to Execute the Query.
- Select Query name and hit Execute Icon.
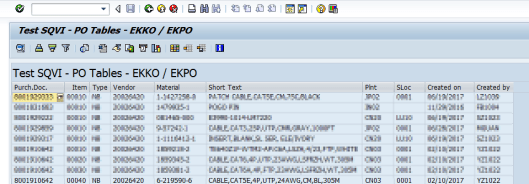
- Enter Selection Criteria and hit Execute Icon.

- SQVI Query / Report
Just a reminder I have created a “part two” to this blog. It covers the Layout Mode and shows how to add new tables to the Purchase Order Query we will create in this Blog. Click here for Part Two
End of Blog – www.portsap.com
If you have question on this or any other PortSAP Consulting blog please feel free to contact us at Blog@PortSAP.com. Or if you are looking for Top Quality SAP Consultants please feel free to contact us.
The author, Ray Hornbrook, has over 18 years of SAP functional and technical experience. Ray started his career in SAP as a MM/PP Subject Matter Expert (SME) for a SAP implementation in 1998 and is now a Senior Level SAP Consultant. Since Ray has worked both sides of SAP, business end user and IT professional, he is able to communicate effectively with both IT and Business team members. Having a background as an SAP business end user has helped Ray greatly in his consulting career. The business background helps him better communicate with the business members of the team. As well as helping bridge gaps in communication between the IT and Business team members.
To find out more about the Ray Hornbrook please check out his LinkedIn profile by clicking HERE.
Neither PortSAP Consulting nor the author of this Blog is associated with SAP AG or with any of its subsidiary or alliance company. Trademarks used in our website are registered trademarks of respective companies and neither PortSAP Consulting nor the author of this Blog is associated affiliated with these companies.

Pingback: SAP SQVI – Part 2 – Creating a Quick Report using Quick Viewer – Cool Tips | PortSAP Blogging