
Tags
consulting, LS05, LS10, PortSAP, Ray Hornbrook, SAP, SAP Consulting, WM
Following my plan to write about issues/requests from the SAP End Users I support this blog will focus on using SAP’s Auto BIN creation functionality to create a large number of WM storage BINs automatically. This functionality works great when creating several hundred BINs at once.
While my goal is that anyone can use the following information to successfully auto create storage BINs this is not a step by step instruction manual and will require a good understanding of SAP WM & Storage BINs.
I also assume all the required WM configuration is setup in your system.
Side Note: As consultant or business analyst it is our responsibility to guide the end users to the best solution. This can be difficult but please keep in mind the solution the end user comes up with may not be the best overall solution. End users should bring us issues, errors or new functionality requests. End users should not bring you solutions. Or more importantly we should not blindly implement the end users proposed solution without first investigating all solutions ourselves.
Two transactions will be used for Auto creating BINs, LS10 and LS05.
Transaction LS10 is considered configuration and not modifiable in test and production environments. As such the changes made via LS10 will need transported to each environment.
Transaction LS05 is a “standard” transaction and can be executed in test/QA and production environments.
Note: The last “step” in this document shows how to “Delete” a range of BINs by the structure setup via LS10. This allows you to do a “test” run in DEV and QA environments.
Procedural Steps
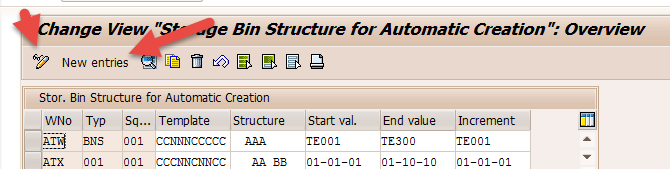
- Transaction LS10 (Storage BIN Structure for Automatic Creation)
The below screen will appear when LS10 is executed.
Ensure you are in Change mode and hit the “new entries” icon.
- Transaction LS10 (Storage BIN Structure for Automatic Creation) – Continued
The below screen will appear. Enter relevant data in all required fields.
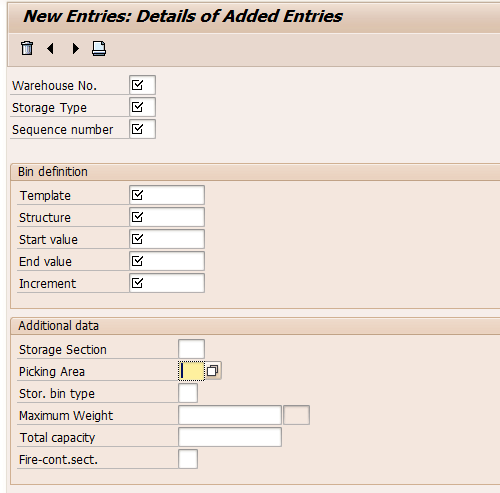
- Transaction LS10 (Storage BIN Structure for Automatic Creation) – Continued
Enter relevant data in all required fields.
- Warehouse Number: 001
- Storage Type: TST
- Sequence Number: 001 – In this example this number is only relevant to LS10/LS05. It allows for more than one BIN structure to be maintained for a warehouse and storage type combination. Since this is first BIN structure setup in LS10 for warehouse “001” storage type BNS we are keeping the entry simple by using “001”.
- Template: CCNNNCCCCC – See below for details
- Structure: AAA – Note there are two spaces before AAA
- Starts: PS001 – See next page for details
- Ends: PS300 – See next page for details
- Increment: 1 – See next page for details
- Storage Section: 001 – This is required in CommScope transactions so is required with running LS05
- Save Changes / Create Transport request (Menu Table View > Transport)
Note: The storage BIN Structure created with LS10 will need to be transported to other environments.

Breakdown of above fields: This section is written with the use of SAP Help. This is one of the times when SAP Help is helpful. This document uses PS001 as the model of our storage bin. Other important information is that we want 300 BINs to be created and for there to be a numerical increase of 1 between each BIN. In our example “PS” is constant for all 300 BINs.
Template:
Specifies how the storage bins are defined for automatic generation.
N = stands for a numeric character between zero and nine
A = stands for an alphabetic letter; this may only be one digit
C = stands for a character common to all the bins
In our example PS001 the “PS” is constant for all BINs and the “001” is numeric. So our entry starts CCNNN. Since the remainder of the Template field is blank in our example we fill it in with C’s.
See SAP example at the end of this document for how a change in this field will affects the auto create functionality.
Structure:
Specifies how the increment for automatic generation of storage bins is to be interpreted. Different letters mean that the digits are increased by the increment independently of one another. Same letters mean that the increment is a multi-digit one.
In our example PS001 only the “001” will change/increase in count. So we enter AAA, which represent that all three numeric spots should be increased in same count. 001, 002, 003…. 021, 022, 024…. 298, 299, 300
If you do not want a part of the Model to change leave it blank / enter spaces. In our example “PS” is constant that we do not what to change so the first to spots in the Structure field are spaces, i.e “_ _AAA”. With “_ _” equaling two spaces.
See SAP example at the end of this document for how a change in this field will affects the auto create functionality.
Start Value / End Value:
The start value and end value are fairly self-explanatory.
In this example we will start with PS001 and end with PS300. This is based on wanting 300 BINs using model PS001.
Increment:
Determines how large the addition is that is to be added on to the storage bin coordinate figures in order to create the “name” of the next storage bin. The value for which the BIN count will increase in our example this is straight forward, PS001 will increase by ones. 001, 002, 003…
As a note: “PS” is not required in this field. Entry could read “_ _001” With “_ _” equaling two spaces. Some Increments setup for other BIN structures are done with spaces.
See SAP example at the end of this document for how a change in this field will affects the auto create functionality.
As stated earlier the last “step” in this document shows how to “Delete” a range of BINs, by the structure setup using LS10. This allows you to do a “test” run in DEV and QA environments. So if you think the structure is right run LS05 (next step) and see. If the BINs were not created as you expected. Delete them and try again. Note BINS have to be empty to be deleted.
SAP Examples
Curr.No. Template Struct. Start.Val End Val Increment
———- ——— ——– ——— ——- ———
1 ANNCCCCCC ABC A11 B22 111
2 ANNCCCCCC ABB A11 B22 111
3 ANNCCCCCC ABB A11 B22 101
———————————————————
Curr.no. 1 creates the following bins: A11, A12, A21, A22, B11, B12, B21, B22
Curr.no. 2 creates the following bins: A11, A22, B11, B22
Curr.no. 3 creates the following bins: A11, A12, A13, A14 ….. A22 / B11, B12, B13, B14 …… B22
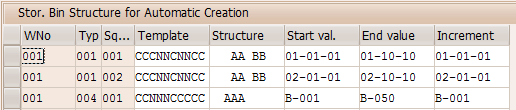
Example of other BIN Structures:
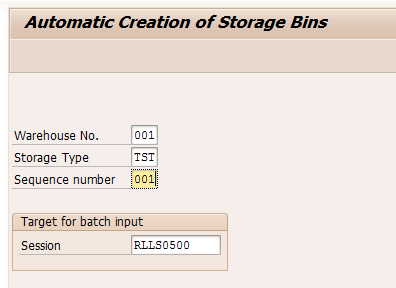
- LS05 (Automatic Creation of Storage BINs) – Initial Screen
Enter Warehouse Number, Storage Type and Sequence of BIN structure created in LS10.
Hit Enter key
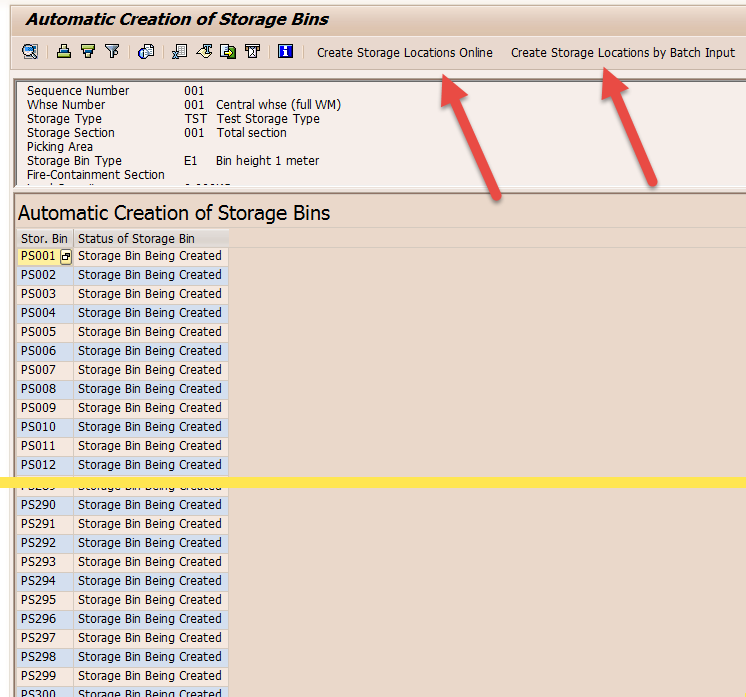
- LS05 (Automatic Creation of Storage BINs) – Continued
List of Storage BINs being created will appear. Scroll down list and verify everything looks good to go.
Once the list is verified select either the “Create Storage Locations Online (foreground)” or “Create Storage Location by Batch Input” icons. For three hundred BINs online works fine.
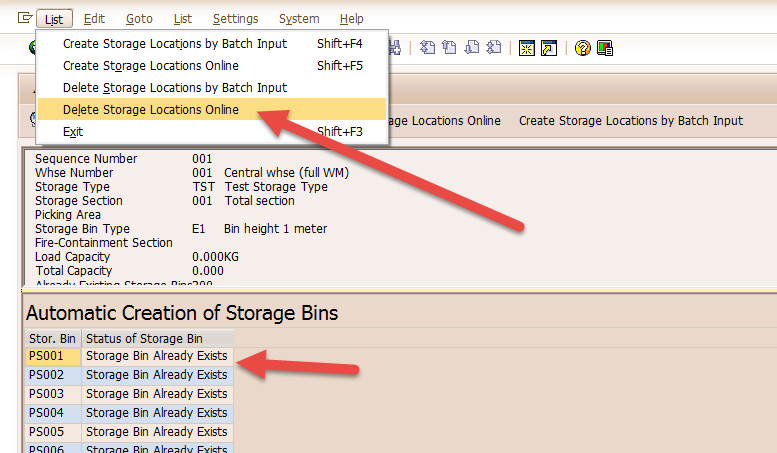
Procedural Steps – Delete BINs by Structure
Delete BINs by Structure – LS05 (Automatic Creation of Storage BINs)
Note BINS have to be empty to be deleted. The status in the list will show that the storage BINs status as already exists.
If you have question on this or any other PortSAP Consulting blog please feel free to contact us at Blog@PortSAP.com. Or if you are looking for Top Quality SAP Consultants please feel free to contact us.
The author, Ray Hornbrook, has over 16 years of SAP functional and technical experience. Ray started his career in SAP as a Subject Matter Expert (SME) for a SAP implementation in 1998 and is now a senior level SAP Consultant. Since Ray has worked both sides of SAP, business end user and IT professional, he is able to communicate effectively with both IT and Business team members. Having a background as an SAP business end user has helped Ray greatly in his consulting career to better communicate with the business members of the team. As well as helping bridge gaps in communication between the IT and Business team members.
To find out more about Ray Hornbrook please check out his LinkedIn profile by clicking HERE.
End of document – www.portsap.com
Neither PortSAP Consulting nor the author of this Blog is associated with SAP AG or with any of its subsidiary or alliance company. Trademarks used in our website are registered trademarks of respective companies and neither PortSAP Consulting nor the author of this Blog is associated affiliated with these companies.

Great blog! The detailed explanation on SAP Warehouse Management’s Auto BIN creation using LS10 and LS05 is incredibly helpful. The step-by-step process and clear examples make complex configurations easy to understand for both beginners and experienced users. Thanks for sharing such valuable insights!